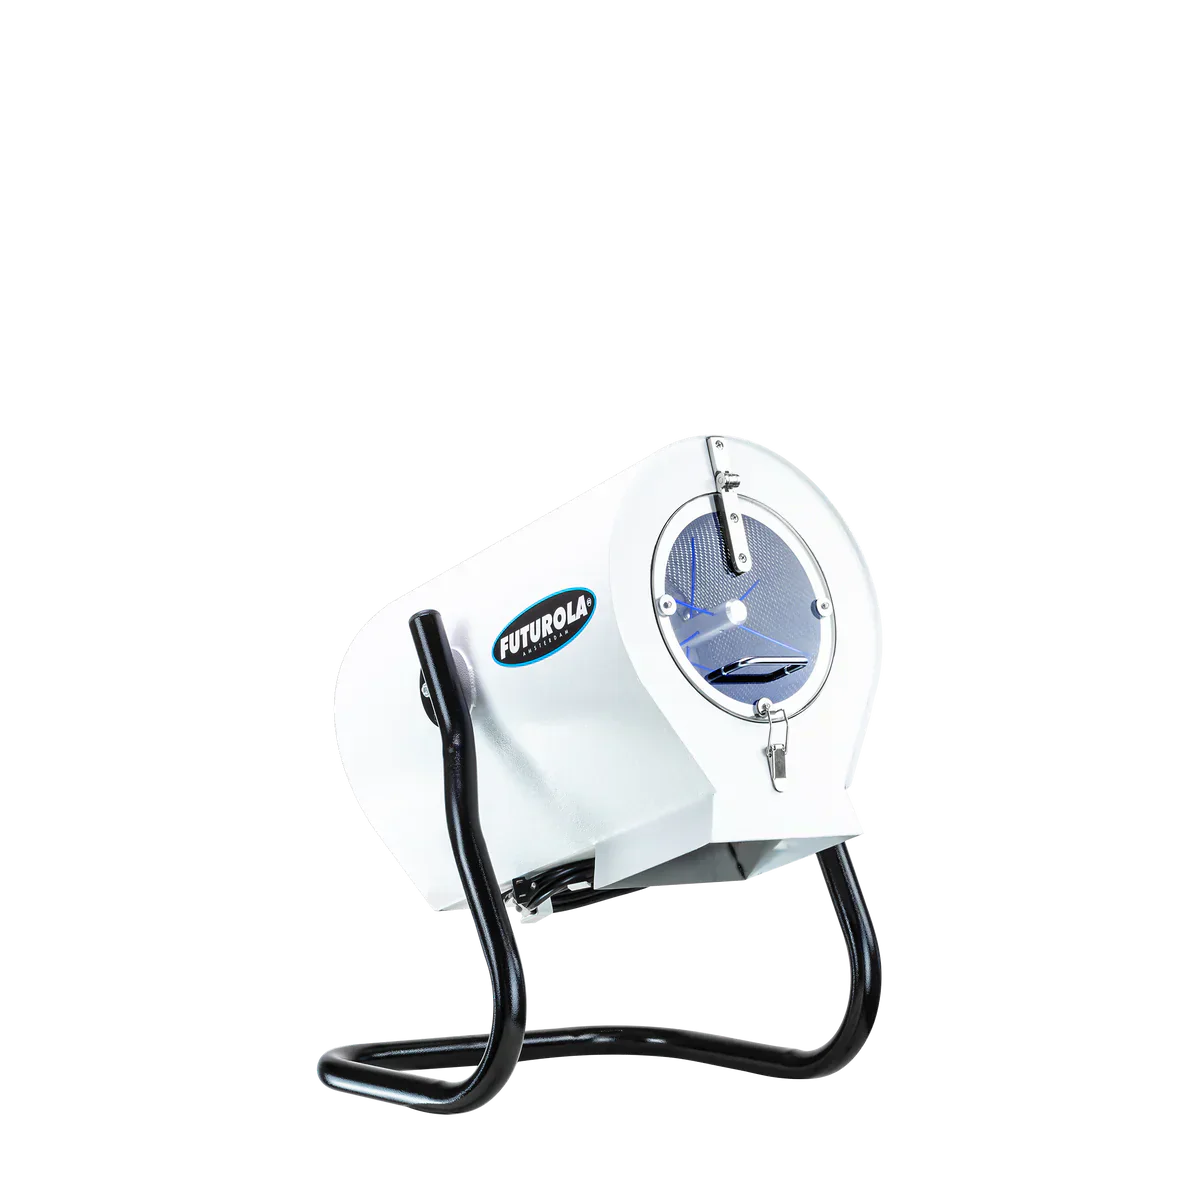
A shredder machine does its job well when it's running smooth, clean, and consistent. But if you're not cleaning it regularly, you're setting yourself up for bad burns, jammed gears, and packed pre-rolled cones that just don’t hit right.
The buildup of resin and plant matter might not seem like a big deal at first, but over time, it starts messing with everything. From your grind texture to how well your cones pack.
This guide lays out the simple steps to clean your shredder machine properly and keep it in top shape for prepping cones.
Whether you’re running it once a week or once a day, a clean machine keeps the sesh efficient and your cones dialed in every time.
Why Cleaning Your Shredder Machine Matters
When you're running either Standard King pre-rolled cones or party-size pre-rolled cones regularly, your shredder machine becomes the backbone of your setup. And like any tool you rely on, it needs upkeep. This isn’t about being a neat freak. It’s about keeping your workflow clean, consistent, and ready to go without last-minute fixes or wasted flower.
The buildup is real. Resin collects fast, gumming up your blades and coating the inside of the chamber. What starts as a light stickiness becomes a full-on performance killer if you don’t deal with it.
Every strain you run through leaves something behind. Whether it’s trichome dust, small plant debris, or straight-up sticky sap. Over time, it clogs moving parts, dulls blades, and starts throwing off the consistency of your grind.
And let’s be honest: no one wants to deal with clumpy flower or a jammed-up cone loader mid-sesh.
Build-Up Kills Performance
Once that resin and dust layer starts building, you’ll feel it. The machine won’t move as smooth.
The grind won’t fluff right. Instead of that ideal, cone-ready texture, you’ll be left with inconsistencies. Some powdery, some chunky. And it messes with the whole flow. Even worse, old residue can mix into new batches.
That’s stale flower in your fresh cone, and it doesn’t taste great. Worse if you’re switching strains and end up blending them without meaning to.
Clean Gear Means Better Grind
You can’t fake a good grind. If your machine is gunked up, even the best flower won’t hit right. Clean internals mean cleaner cuts, more airflow, and a grind that packs smooth and burns even.
That’s the goal every time you prep a cone. And you can’t hit that standard if your blades are covered in sticky leftovers.
A quick cleaning cycle saves you way more time than it costs.
Long-Term Damage Adds Up Fast
You don’t need to deep-clean after every use, but if you go weeks without wiping down your shredder, you’ll pay for it. Resin buildup hardens.
Dust turns into cake. Eventually, it puts strain on the motor, especially if you’re running bigger batches. That’s how you burn out your machine early or need a blade replacement way sooner than expected.
Regular upkeep keeps your gear in play and your grind game strong.
When Should You Clean Your Shredder Machine?
You don’t need to scrub your shredder down after every session. But if you’re using it often, a regular rhythm makes all the difference.
Waiting until your machine is sticky, slow, and grinding unevenly is too late. A quick clean when it’s still running right takes two minutes. A deep clean after it’s caked up? That’s a full mission. The goal is to stay ahead of the mess, not chase it.
Cleaning isn’t about being obsessive. It’s about making sure your grind hits right every time. Shredder machines pick up residue faster than you think, especially if you’re running through sticky or fresh flower.
A solid schedule keeps things simple, clean, and running on point.
Quick Clean After Every Use
You don’t need to go deep every time, but you should be doing the basics after each use, especially if you’re shredding multiple times a week. A simple wipe-down of the tray, blades, and outer housing prevents resin from setting in.
It’s the difference between a fast cleanup and having to chip away at dried build-up later. This is especially key if you’re about to switch strains or prep a new batch.
Residue from one strain can mess with the taste and texture of the next.
Deep Clean Every 3–5 Sessions
This is when you break it down a little further. Grab the brush, some isopropyl wipes, and hit the parts that collect the most gunk. Corners, blade edges, screens, and inner seams.
If you’re running heavy or using sticky, terp-rich flower, you might want to clean more often.
You’ll know it’s time when your grind isn’t coming out even, or you start hearing the machine strain during a cycle.
Look for the Signs and Stay Ahead
Sometimes the machine tells you when it’s due. If your shredded material looks off, too powdery, too chunky, or just inconsistent, it’s likely buildup affecting the blades.
If you see resin streaks or smell lingering funk from past batches, that’s your sign. A quick visual check before and after use keeps you aware.
Don’t wait for your shredder to slow down or jam mid-prep. A smooth grind starts with a clean machine.
Step-by-Step Cleaning Process
You don’t need to do a full teardown every single time. But when it’s time to deep clean, this is how you get your shredder back to running like it’s brand new.
Clean tools don’t just make the prep smoother. They protect your flower and preserve the flavor.
Whether you’re running a Mini Shredder, OG Shredder, or Pro Shredder setup, the method is mostly the same: stay organized, be gentle, and don’t skip the details.
Step 1: Power Down and Disassemble Safely
Unplug the machine. Always. Even if you’re just dusting it off. This part seems basic, but it’s non-negotiable. Machines shouldn’t be touched while powered, period.
Once it’s unplugged, remove the chamber lid and any removable trays, barrels, or screens. Depending on the unit, some pieces might twist or snap out.
Don’t yank or force it. If it’s stuck, you’re probably dealing with resin buildup, so take your time and work it loose slowly.
Step 2: Brush Out the Debris and Tackle the Sticky Spots
Now that you’ve opened it up, start brushing out any loose flower, shake, or kief. Focus on the corners, blade areas, and seams where the residue collects.
Use a small brush (a toothbrush or soft-bristle paintbrush works fine) and avoid anything metal or sharp that could scratch the surface.
After the dry debris is gone, it’s time to handle the stickier stuff. Grab a cloth or cotton pad soaked with 91%+ isopropyl alcohol and wipe down every surface that’s gummed up. Let stubborn spots soak for a few minutes before wiping again.
Resin wipes right off once the alcohol does its thing.
Step 3: Pay Attention to Screens and Specialty Parts
If you’ve got a shredder with a destemmer or sifter barrel, give those components extra attention. The sifter screen in particular catches a lot of kief and clogs easily.
Use a brush and a little alcohol to gently clean the mesh without bending or tearing it.
For the destemmer unit, wipe down all contact points and gears. These features are designed to streamline the prep process, but only if they stay clean and moving freely.
Step 4: Dry Everything and Reassemble with Care
Once you’ve finished wiping everything down, make sure each part is fully dry before putting it all back together. Leftover moisture can cause mold or mess with your grind.
Let parts air-dry for 10–15 minutes, or pat everything down with a dry towel. Don’t rush the process. Reassembling wet or sticky pieces can lead to gunk buildup and slower performance later.
Once dry, reattach all components and test the machine on a dry run. Just a few seconds to make sure it hums evenly and no parts are misaligned. If it sounds smooth and feels balanced, you’re good to go.
Tips for Keeping It Cleaner Longer
A clean shredder doesn’t just run better.
It saves you time and keeps your cones tasting right. Regular maintenance doesn’t have to be a full breakdown.
Quick habits and smart storage go a long way toward keeping everything working like new.
Tip #1: Brush It Out After Every Use
Right after a session, take 30 seconds to brush off any leftover material. A soft brush or small detailing tool can knock loose herb before it has time to stick and harden.
Even a few taps and swipes can delay heavy resin buildup. The goal here isn’t a deep clean. It’s just to reset the chamber so you’re not stacking grime batch after batch.
A clean start every time means fewer issues later.
Tip #2: Store It Right Between Sessions
Your environment matters. Dust, moisture, and airflow all contribute to how much junk collects on your shredder.
Keep it in a dry spot, and if you’re not using it every day, toss a cloth over it or put it back in its case or box.
Leaving it open or exposed can turn the leftover resin into a sticky mess that attracts everything from lint to pet hair. Good storage keeps things cleaner without even touching the machine.
Tip #3: Manage Moisture in Your Flower
The condition of your bud plays a big role in how dirty your shredder gets. Sticky or wet flower dumps more resin, gums up blades faster, and sticks to everything inside.
If your herb feels too moist, let it dry out slightly before shredding.
Aim for a good middle ground. Still fluffy, but not wet. Adding a humidity control pack to your jar keeps your flower in the sweet spot and your shredder running smoother.
Tip #4: Maintain Key Components with Light Lube or Cleaner
Moving parts like hinges and blade joints can start to squeak or resist if they’re ignored too long. Using a small amount of food-safe lubricant or blade-safe cleaner can keep those parts operating smoothly.
Just don’t overdo it. Too much oil or cleaner can attract debris. Apply it sparingly, wipe any excess, and move the parts around to let it settle evenly.
Smooth movement equals smoother shredding.
Tip #5: Clean and Reinstall Sifter Screens Carefully
If your shredder uses a sifter screen or fine mesh for kief separation, keep it clear. Those screens clog faster than anything else and can mess with the airflow and consistency of your grind.
Remove the screen regularly, clean it separately with a soft brush or alcohol wipe, and reinstall it flat and secure.
If it’s warped or loose, it won’t do its job right. And worse, it could shift during use and throw off the whole system.
Step #6: Skip the Compressed Air and Stick to Manual Cleaning
Blasting your chamber with compressed air sounds like a good idea, but it usually does more harm than good.
Instead of clearing things out, it pushes fine particles deeper into seams, motors, or areas that are hard to reach later.
A brush and a cloth give you more control and don’t scatter particles everywhere. Clean with intention, not force. That keeps your setup cleaner and your workspace less chaotic.
Final Thoughts
A clean shredder doesn’t just make prep easier. It makes everything better.
From grind quality to packing speed, everything runs smoother when your machine isn’t bogged down by old residue. Whether you’re rolling one cone or loading up a tray, that clean, even texture starts with a well-maintained shred.
Taking care of your shredder means fewer problems, better cones, and a smoother sesh every single time. The payoff is in every hit, every pull, every even burn. You don’t need to overdo it. Just stay consistent.
So clean it like you care about your cones. Because the difference shows up in every pack, every roll, and every smooth hit that follows.

LEAVE A COMMENT
All comments are moderated before being published.
This site is protected by hCaptcha and the hCaptcha Privacy Policy and Terms of Service apply.